1/31/16

Whale Watching season at the Aquarium of the Pacific.

It is whale watching season here in Southern California.  As the Gray Whales migrate south for the winter, they swim through Southern California on their annual trip to the lagoons of Mexico.  Harbor Breeze Yacht Charters and Cruises is partnering with Aquarium of the Pacific to offer the best whale watching experience.  We have been part of this unique travel adventure for years and want to share the beauty and splendor with you.  Recently, our family was able to ride along with the Harbor Breeze crew and Aquarium of the Pacific whale experts.  The family memories we created on this trip will be forever remembered.  We suggest you schedule your trip with Harbor Breeze and create your own amazing memories as well.  (Disclaimer: Sponsored post. All thoughts and ideas are all my own.) Watch the video to find our more....

whale watching

We were extremely lucky to see grey whales in their natural habitat on our trip. As we sailed and encountered the gentle giants, the crew shared valuable information. 

Facts: 

  • The whale migration begins in the Arctic in the fall travelling to the lagoons of Baja Mexico peninsula to give birth to their calves.  
  • These giant mammals swim more than 15,000 miles round trip each year.  
  • It is estimated that the population of these astonishing mammals is around 26,000.  
  • Surprisingly, the grey whales do not have teeth like you and me.  
  • They have baleen plates that hang down from the roof of their mouth.  
  • The baleen is made of keratin, the same as our fingernails that capture sediments from the sea floor as they travel.  

Who knew these mammals had no teeth! 


On this trip, we shared a state-of-the-art luxury catamaran water craft with other writers, the local news media, local bloggers, Aquarium of the Pacific mammal scientists and school aged students.  All of us were brought to many moments of disbelief when we encountered these giants of the sea.


There were many future scientists being shaped on our whale watching experience.  Our family has been sailing with Harbor Breeze Cruises for several years now.  Each experience is unique and nothing like the other.  What still stays the same is the fun of observing sea life up close with an experienced Captain and scientist from the Aquarium of the Pacific.  This year, our kids announced their interest in becoming scientists because of their trip.


Captain Dan Salas made the experience unique and personal with his knowledge of the Pacific Ocean.  He makes you feel very safe and comfortable on board his watercraft.  His many years of experience comes through as he navigates through the open waters surrounding Long Beach.  During the cruise, he is in constant communication with others on the water to find the best locations for viewing these amazing animals.  Sightings vary from trip to trip, however, our trip allowed us to see 4 grey whales, a Humpback whale and we were on the hunt for a pod of Killer whales (Orcas) but they escaped our endeavours.  On the early AM cruise, they found over 10 Grey Whales and many times pods of dolphins and seals will dance around the vessel. 


Visiting the Aquarium of the Pacific after our sea adventure was the icing on the cake.  We were also provided the opportunity to experience the touch pools inside the aquarium.  Here, everyone is encouraged to touch and ask lots of questions.  This hands-on educational exhibit is filled with sea urchins, sea stars and hermit crabs.  It feels as though you are scuba diving with them in the ocean. 

If you want an incredible day of adventure, education and family fun, we recommend you schedule a trip on the water with Harbor Breeze Yacht Charters for the grey whale season.  The season starts in October where the mammals travel approximately 80 miles a day.  The best viewing in Southern California starts in December and ends around the beginning of March.  Come on out and join us on this truly amazing adventure.

Please visit our sponsor: http://whalewatchinginla.com/
Call to find times and prices: (562) 983-6880 
Weekdays whale watching cruise times: 12-3pm
Weekends whale watching cruise times: 9am, 12pm & 3pm

1/20/16

8 Family Health Tips when on a family field trip.

Going out to have a fun family field trip is a great way to bond and enjoy some fun together.  However, going to public places can be hazardous to your health causing all sorts of health related illnesses.  From viruses to bacterias including strep, staphylococcus, mononucleosis, flu, e-coli, bed bugs and even fecal matter, there are a host of germs that can negatively impact your family.  The good news is even though cleanliness at your favorite field trip location may not be up to your standards you have at home, there are things a family can do to protect themselves. We want nothing more than to provide your family with great tips to help your family stay safe, healthy and happy while out on your adventures.  Let's take a look at some things to think about.
We are huge movie fans and enjoy our time together at the movie theater.  As we walk in, you can hear popping echoing through the lobby as the smell of buttery, salty goodness of the popcorn as it rushes through your nose.  You can see the brightly colored packages of Red Vines, Goobers and Sour Patch Kids in the candy display while hot dogs are sizzling as they roll back and forth in the warmer.  The lobby looks clean as you glance across the large open lobby however what is truly awaiting for us as we approach the counter?  This is your time as a parent to assess the situation and if it doesn't seem clean, trust your instinct.  According to professors and assistant professors of clinical laboratory science at Saint Louis University, one needs to use their best judgement and error on the side of caution.  Remember, concession stands are mini kitchens which are required to ensure food safety for its guests.  Food items must be kept at proper warming / refrigerated temperatures at all times and theaters are no exception to health inspections.  If the soda machine area appears dirty, the popcorn seems to have been sitting a while without the machine popping a fresh batch or there is just a general dirty appearance behind the counter, you should question your purchasing decisions.  Watch the staff as they prepare other patrons orders, did they wash their hands while you were standing in line?  Are they wearing food safety gloves and changing them for each new customer? Paper and coin money is one of the dirtiest items we touch on a daily basis.  Did the cashier handle money then serve food without washing their hands or do they have runners helping them?  Assess the situation and make healthy choices for your family.

Other places to consider include the theater seats, the drink holders, 3-D glasses, the theater floor and the facilities.  Experts have studied all of these areas and found issues at a host of public places across the Nation.  Understand experiences described above are not the norm, however, you can never be too sure and you have to take precautions into your own hands.  Studies have discovered group B strep and fecal matter on theater seats as well as a host of other germs.  Drink holders and arm rests are touched many times a day and are hard for theater employees to clean in between showings.  With sugary drinks present multiple times a day, bacteria quickly multiplies and can be an excellent source of illness.  Although your 3-D glasses may have a plastic wrapper on them, it is possible that staph is still present which can lead to facial skin infections or even worse, pink eye or other staph infection of the eyes.  Maybe the theater floor feels sticky under your feet.  It's no wonder when sugary sodas can easily get spilled in the darkness of the theater.  This area can be a breding ground for viruses and bacteria.  Finally, the facilities; with hundreds of people lining the halls to see the latest episode of their favorite childhood space exploration, the facilities are used numerous times a day by hundreds of people.  Although probably the cleanest area of any facility, the risk of germs are elevated during peak hours when the focus is on moving people in and out of the theater and filling their popcorn buckets and gallon sized sodas.

WHAT TO DO TO PROTECT YOUR FAMILY:
All of the preceding is very possible at any public location and taking steps to minimizing your risk is really the focus we would like to share.  We are not attempting to shame any business because truthfully, many businesses "DO" care about the safety of their guests.  So, what additional steps can you take to protect your loved ones?

Do a Litmus Test on their Food - Parents, you need to understand that children have limited attention spans and many cannot communicate circumstances that they might be experiencing even up to the age of 12.  Think about this, can your 3 year old tell you if their food or drink is too salty, too bitter, has a funny taste or tastes like alcohol?  A few years ago, Los Angeles news stations reported on a National restaurant chain who accidentally served a child alcohol.  The saving grace in this story was the parent was smart enough to taste every food and drink item for their child prior to letting her chow down.  It was this parents wise family practice that saved the child from a potentially deadly encounter with alcohol poisoning.


Serve yourself Soda - Attend theaters which provide the serve yourself soda bar.  Pay special attention the cleanliest of the area and if it looks atrocious, point it out to a manager immediately.  Under poor conditions, prevent your cup from touching any surface areas.  Do not set your cup down on a dirty looking counter top to attach your lid.  Instead ask for your family to help hold the popcorn and candy while you attach your lid.  If the lids appear to be handled by another person, opt for a lid further into the holder to ensure it's cleanliness and inspect your straw to ensure it is completely sealed.  Your safest bet, choose bottled water as your drink.  Nobody needs the extra calories and your body will thank you for a splash of the good stuff.
Bring Sanitizing Hand Cleaner or Wipes - Use a few sanitizing wipes or grab a tissue and squirt some hand cleaner into it.  Make sure your hand cleaner contains at least 60% isopropyl alcohol.  Wipe down everything and don't cross contaminate.  Use one wipe for the drink holder and arm rest, use another for your 3-D glasses and make sure to squirt a bit into your hands before you dig your mits into that popcorn bucket.
Watch your kids - Kids are kids and if they drop their last Reese's peanut butter cup on the floor before the movie even gets started, you can bet they are going to chase after it!  Really, who wouldn't right...it's a peanut butter cup!  Now, I am not a germ-o-phob by any shape and I firmly believe the 5 second rule is occasionally healthy for building your immune system against everyday germs.  However, as I mentioned, the floor of a movie theater is a breeding ground for illness.  The rule of thumb for any location that you are field tripping at should be, Location, Location, Location!  Aunt Sally's kitchen floor is probably pretty safe especially when you can smell the scent of bleach from the front drive.  Watch your kids and make sure they aren't picking up anything off the floor that could have been contaminated or for that matter looks like a candy but is another patrons heart, diabetes or blood pressure pill.  BOTTOM LINE - WATCH YOUR KIDS!!!
Theater Seating -  There isn't too much you can do to be safe.  Let's face it, other people have sat in the seat you have chosen and theaters just don't have the resources to replace them every time you decide to go to the movies.  So, What to do?  Wear long pants and shirts that cover your entire upper body.  Do not take off your shoes to expose your bare tootsie's (feet) to the potentially grimy floor.  If you must touch the seat with your hands, use sanitizer before you dig into your snacks.  Extreme measures might include grabbing a paper towel or toilet safety sheet and place it on your seat just in case.  Consider removing your clothing after you get home and wash them immediately.
Popcorn / Candy sharing - Don't let anyone just dig in with their bare hands.  Remember kids are kids and they are climbing over everything, jumping in their seat and touching who knows what near them.  Ask the concession stand for some extra trays or drink holders to use as a tray and then pour snacks into each family members separate container.  This helps keep the germs localized should illness break out.
Facilities - Take careful assessment of the condition of the facilities.  If the floor is dirty or there is pooling water on the sink, its a pretty good sign nobody has cleaned them in a while.  Speak to a manager immediately to have this corrected before you decide to go.  Use soap and warm water to wash your hands and use a clean piece of toilet tissue or paper towel to open the door.
Where to Place my Purse - Girls, Don't Place Your Purse On The Floor!!!!  Leave it at home, place it in your lap, find a clean place to hang it or leave it in the trunk of your car out of visibility.  Enough said!
By taking care of your family with a few easy steps, not only are you protecting yourself but in the long run you are protecting the health and safety of others in your community.  Let's all do our part to living a cleaner and healthier lifestyle.  Now join us and go enjoy a movie at your local theater.  We will be however just with some extra precautionary measures!

1/16/16

How to Make the Perfect Smoothie.

The holidays are over and we were filling a little sluggish with all of the heavy holiday foods. To start off the New Year, we created the perfect, delicious and nutritious smoothie that you can easily make at home for your entire family. To get us back on track, we started with Green Valley Organics Kefier Blueberry Pomegranate Acai Lactose Free Drink. This product is amazing by itself, our favorites so far are the Strawberry Banana Kale and the Blueberry Pomegranate Acai Diary Drinks. Their organic diary product is made with 100% fresh organic milk from local Certified Humane diaries, is lactose and gluten free, kosher certified, and contains 10 live and active cultures.

This weekend we were looking for a mid-morning snack and decided to create smoothie treats. Our smoothie recipe is a fraction of the cost of those popular smoothie shops and your kids are going to love it!  It is loaded with vitamins, fiber and antioxidants.  It will fill your loved ones up and give them a head start on their daily intake of vitamins.  Here's the recipe.

organic smoothie

1 Medium Gala Apple - Cored & Sliced
2 Kiwi - Peeled
1 Stalk of Celery - Scrubbed with Vegetable Brush
1 to 2 Heaping Handfuls of Fresh Baby Spinach - Thoroughly Rinsed
1 1/2 Cup of Frozen Blueberries and Blackberries
1/3 to 1/2 Bottle Green Valley Organics Kefier Blueberry Pomegranate Acai Lactose Free Diary Drink
3/4 to 1 Cup Pom Pomegranate Juice
1 to 2 Tablespoons Chia Seeds
16 Oz Crushed Ice

Homemade Smoothieberry smoothie

In your Ninja (high speed blender), add the diary drink and Pom Juice.  Next, core the Gala apple and slice it into the blender.  Then peel your Kiwi and wash the celery, slice both into 1/4" slices and place into the blender.  After, add your spinach, ice and frozen berries and top it off with the Chia Seeds.  The ingredients should fill your blender completely allowing for the lid to easily lock into place.  Blend all of the ingredients on high speed for 3 minutes or until everything is combine well and the large chucks are smooth.  The recipe should yield about 64 ounces or 8 cups.  Add more spinach, berries and diary drink as needed to increase the amount of smoothie produced.  If your smoothie is too thick, add additional Pom Juice a splash at a time, blend until you reach the thickness you desire.  Serves 4 adults or 2 adults and 4 kids.  

kefier drink

Green Valley Organics Diary Drinks and other products can be found at Ralphs, Sprouts, Whole Foods and Vons. All other ingredients can be found at Whole Foods, Sprouts or your local grocery store.


Disclaimer: Not a sponsored post. All thoughts and opinions are all my own. You do not have to be lactose intolerant to love this yummy smoothie. 

1/6/16

Crayon Craft: Make Hello Kitty & Lego crayons!

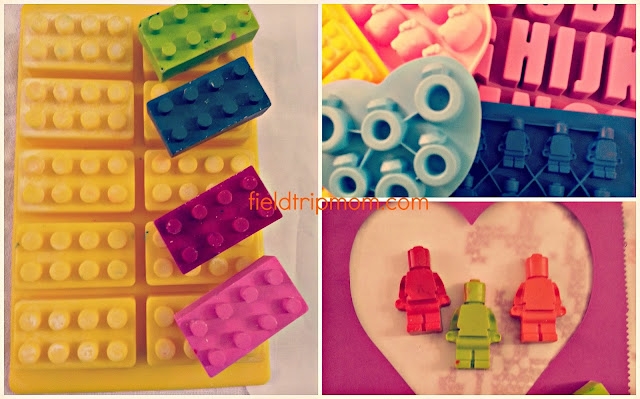
Make a regular day into a fantastic, fun day with silicone molds and your extra crayons.  Handmade Hello Kitty & Lego Crayons for Valentine's Day is easy.  All you need is a few supplies in which you may already have at home. Re- purposing crayons by melting them into cute designs is also Earth friendly. Before starting this project, we suggest you purchase the Hello Kitty and Lego Molds. We bought our silicone molds on Amazon and it was delivered within 5 days. You may purchase other similar style silicone molds at your local craft stores such as Hobby Lobby, Michael's Craft or Jo-Anns in the baking section. Target  may carry similar molds in their baking section. Please note, you must make sure the molds can withstand oven temperatures so make sure they state "Oven Safe".  
Hello Kitty Cat

Supplies: Crayons, silicone molds, baking sheet, hot pads and an oven. 

Step One: Separate your crayons by color or the color combination you want your crayon to take shape.  First, remove all of the paper wrappers off the crayons with an X-Acto knife by slitting the crayon down the side and peeling. Once the paper is off the crayon, cut them into small pieces.  We recommend cutting the crayon in 4 or 5 pieces.  The smaller the crayon the easier it will be to fill the silicone slot.  We used approximately 3 to 4 crayons in each of the mold slots but it will vary dependent on the size of your mold.  On these cute little Hello Kitty faces we used a dash of white on the bottom of the mold.  The rest of each mold had different shades of pink, red, bits of orange and yellow. When you bake the crayons in the oven, multi colors will not mix together but instead create a swirl pattern.  It's okay to slightly over-fill the silicone slot with crayons however try to break up the crayon pieces to fill in all of the gaps in the mold.
hello kitty

Step Two: On a cookie sheet, place your silicone mold with the broken crayon pieces and bake in the oven. Bake the crayons at 230 degrees Fahrenheit for approximately 20 minutes.  Check to make sure the crayons have completely melted and that it's a complete liquid crayon.  If it looks like the silicone slot is only partially filled then add more crayon of the color you desire and put the silicone mold back in the oven.  You will want to bake for another 5 minutes until the entire crayon is melted. Tip:Do not use Crayola Twistables crayons as they do not melt very easy. 
Hello Kitty
Step Three: Now your crayons should be nice and hot and will need to be cooled off. We suggest you leave them to cool overnight. It will be easier to remove the crayons from the silicone when it has completely cooled off. Otherwise, wait at least 2 hours before popping off the crayon from the silicone mold. To speed up the cooling processes you can put them in the freezer for about 45 minutes. You will have to check to make sure it has completely cooled off before removing. Otherwise you run the risk of breaking the crayon.
lego crayons
Educational Tip: We discussed with our kids the solid to liquid effect. 

To make these cute Lego Brick crayons you will need the Lego mold, which I purchased on Amazon.com. They are worth the wait and money. Use the same method mentioned above to fill the silicone mold and repeat until you make your desire quantity. We made two batches. 
lego
We made a few in solid colors and some in mixed color combinations. These cute crayons make a great gift idea for Valentine's day, birthday's or just because you love to have fun. Get inspired to have fun. 
Handmade Legos
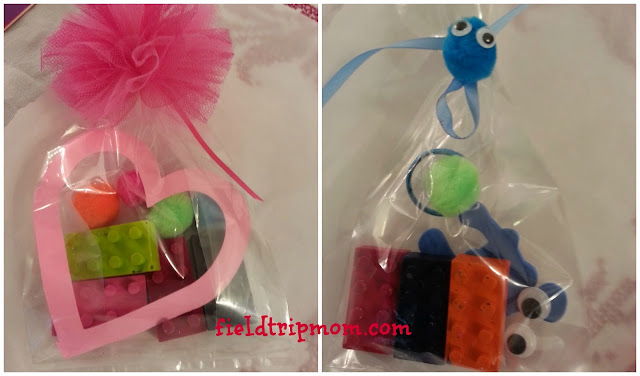
Wrap these beautiful crayons with some googly eye monsters and other fun items in a clear bag as a gift. Watch the kids and adults get inspired.
Gift ideas

Have a great Valentine's Day!

Disclaimer: Not a sponsored post. This is a personal blog. All thoughts and ideas are all our very own. Questions: fieldtripmom@gmail.com 

1/4/16

Norm of the North.

What happens when a polar bear and his three Lemming friends decide to go to New York City to stop a land developer from destroying their home?  Coming January 15th, 2016, Norm of the North movie is showing in theatres nationwide and our kids are excited to view it.  As movie goers, we usually do crafts or something fun related to the topic at hand.  This time we are doing a Polar Bear science experiment and a Polar Bear drawing. Continue reading to find fun activities that will inspire you to love Polar Bears.

Norm of the North

We drew our best "polar bear" art! We used crayons, pencils and our imagination to make our best Polar Bear pictures!  We discussed polar bear facts and made a fun educational game out of it.  

Did you know that Polar Bears: 
  1. In the wild, polar bears live an average of 15 to 18 years, although biologists have tagged a few bears in their early 30s. In captivity, some long-lived bears reach their mid- to late 30s. Debby, a captive bear in Canada, lived to be 42 years old. 
  2. Polar bears live across the Arctic. There are five nations with polar bears: U.S. (Alaska), Canada, Russia,Greenland (Kingdom of Denmark), and Norway (Svalbard). Polar bears do not live in Antarctica.
  3. Polar bears have black skin and although their fur appears white, it is actually transparent. 
  4. The largest carnivore (meat eater) that lives on land. 
  5. Polar bears use sea ice as a platform to hunt seals. 
  6. Polar bears diet is mostly eating seals. 
  7. Male polar bears can weigh up to 680 kg (1500 lb). 
  8. Female polar bears are thinner than the males by half. 
  9. Polar bears spend most of their time at sea. 
  10. Scientists estimate that there are around 20,000 polar bears. 
  11. Polar bears have 42 teeth. 
  12. The scientific name for the polar bear is ‘ursus maritimus’. 
  13. Polar bears keep warm thanks to nearly 10 cm of blubber under the skin. 
  14. Polar bears have an excellent sense of smell, with the ability to detect seals nearly a mile away.Polar Bear Science
We also had a little fun with a Polar Bear Science experiment.  The goal was to find out how a Polar Bear Paw experiences the cold.  First, we filled a bowl with ice and cold water.  We put our hands in the cold bowl of ice water and counted up to 20.  We all had freezing hands after this step.  Next, we used a Ziploc bag and placed Lard (Crisco) inside.  Then, we placed another Ziploc bag inside the first by flipping it inside out and zipping the two bags together.   You should have a sealed pouch with the lard in between the two bags.  For an extra layer, we wore a plastic glove as well however this is not required.  We put our hands inside the Ziploc bag and placed it into the cold, ice water.  Each person took turns dunking our gloved hand into the ice water with the lard being used as a layer.  The temperature was very different with the layer of Lard.  It was much warmer and we could weather the cold far easier.  We all had a good laugh about the blubber.


We hope that you go and watch Norm of the North and enjoy a great movie adventure. The activities above are meant to capture your inner Polar Bear spirit. See you at the movies!!!


Disclaimer: Media post. We have been invited to view the movie a few days before it opens. Visit the Norm of the North website. No polar bears were injured in the making of this post. 

Handmade paper flowers that will inspire love!

Valentine's Day is just around the corner.  Why not make beautiful paper flowers for the person you love and watch them get inspired by your craft.  A few months back, we had the opportunity to make two dozen paper flowers that we gave away.  The kids were amazed how paper, a stapler and scissors created some beautiful large bouquets of flowers.  The adults that received them asked where we bought them?  When they heard they were handmade by us their hearts melted and were extremely thankful. 
flowers

Supplies you will need:
  • Card stock paper - We used Reflections purchased from Joann's Fabric and Craft store.  Buy several different colors of paper. We used size 8 1/2 x 11 inches.  
  • Sharp Scissors
  • Staplers
  • Tape 
  • Ruler
  • Hot Glue Gun and glue sticks.
handmade
Instructions:

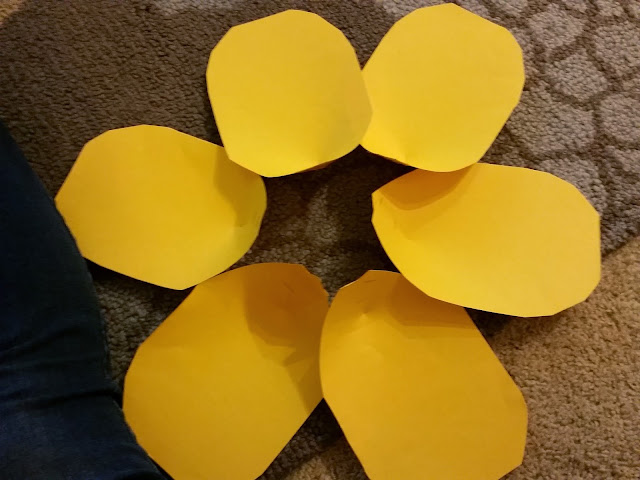
First, decide how big you want your flower to become.  Then cut the petals different sizes into tear drop shapes.  Your first flower will be a tester as it will become easier the more you make. We made three different size patterns: Small, Medium and Large.  Use a whole 8 1/2 X 11" piece of paper for the large petals, half of a sheet or 5 1/2 X 8 1/2" piece of paper for the medium petals and a quarter of a sheet or 4 1/4 X 5 1/2" piece of paper for the small petals.  We made the large petal first and then worked our way down.  You will need to cut 5 - 6 large, 4 - 5 medium and 3 - 4 small petals for one flower.  We played around with the combination of petals to make the flowers look different.  You can also start with medium or small sizes as the outer petals and cut smaller pieces of paper for the inner petals. 
flowers paper
Once you have all your petals cut and arranged, you can then start cutting a small 1" to 4" slit on each petal.  You will cut the slit on the bottom pointed part of the tear drop.  The longer the cut, the more flexibility you will have in the curve of your petal.  The purpose of this cut is to allow you to cross the two slits together and staple to make a small bend in the flower.  The paper slit should over lap a little to make it look like a tiny curve in the petal.  This process will make it stick up and look like a blooming flower. Experiment with crossing the slits over one another to see how it affects the curve in the petal.  See picture below.
valentines day
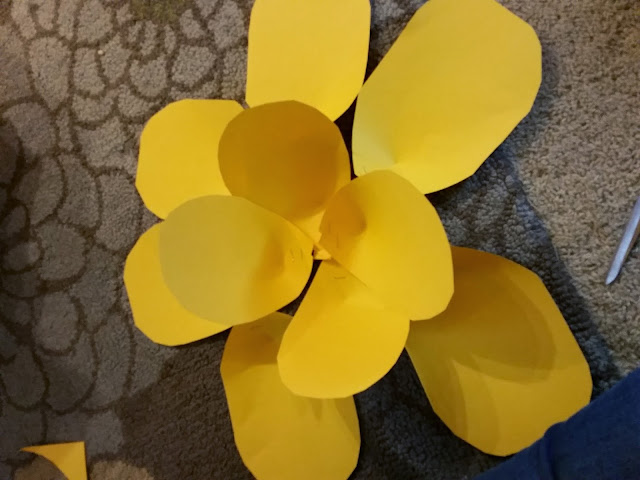
You will need to make the slit on all the petals.  Once they are made you will need to staple the two sides by overlapping one side over the other to make a small curve cup design.  Each petal should have this detail before gluing together.  Arrange the petals the way they are suppose as a finished product.
paper flower
To making the middle stigma of the flower, you will need a piece of paper 12 inches long and 4 inches wide.  You will first fold it in half so that it is even.  Next, you are going to cut small slits along the folded edge approximately 1/8 - 1/4" apart to make the item shown above.  The slits should stay 1/3 - 1/2" from the unfolded edge, not cutting through.  After you have cut slits down the 12" strip, use a pencil to bring it together by wrapping it tight into one piece.  Staple the bottom unfolded edge together and gently fluff the cut strips to bring flare to the edge.
paper flowers
Finally, you have all the pieces cut.  Lay them out starting with the large outer petals and slightly overlap your 5 - 6 petals so they create a uniform circle.  You will use a hot glue gun to put all of these pieces together. Glue them together at the stapled tear drop edge.  Start by gluing the large pieces first, next the middle, then the small pieces and lastly glue the stigma in the center of your flower.

Once you have completed one, you will see the process and it is easier to create a large bouquet by cutting multiple colors and sizes of pieces of paper at once.  Make an assembly line and the process becomes quick and easy!  Enjoy!!!

Happy Valentine's Day!

Field Trip Mom Blog

Discover Free and Low-Cost Summer Fun for Families in Los Angeles!

Discover Free and Low-Cost Summer Fun for Families in Los Angeles! 🌞🎨🎭 Summer is here, and if you’re looking for fun, enriching, and affo...